You can control what folders and layers display in the SkylineGlobe Layers section of the Project Tree of each CWA. In SkylineGlobe Manager, create any number of different tree configurations, by adding, deleting and renaming layers to the standard SkylineGlobe Layers and then add the appropriate Project Tree to each of the CWAs.
To create a Project Tree:
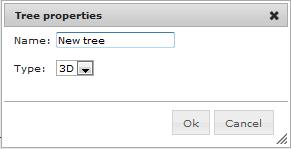
1. On the SkylineGlobe Manager, Layers Manager page, in the Defined trees field, click New. The Tree properties dialog box is displayed.
New Tree Properties
2. Type a Name for the tree, and select a Type – 2D or 3D. The Layers Manager displays showing the Root node.
Note: If you want to modify a tree, in the Defined trees field, select the tree you want to modify. The Layers Manager displays showing its folders and layers.
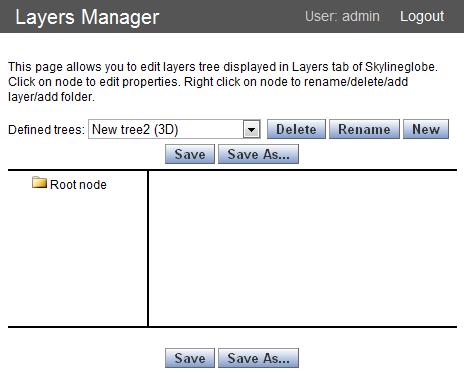
Layers Manager
3. If you want to add a layer, right-click and select Add layer. The New Layer Properties dialog box is displayed.
|
Property |
Description |
|
Name |
The layer name. |
|
Icon |
An icon that will represent the layer in the Project Tree. |
|
Type |
Select Checkbox to enable multiple selection (display) of folder layers. Select Radio button to require a single selection. |
|
Fly URL |
The URL of the associated FLY file. Note: For a 2D Tree, this field is replaced by a Layer field and a Configure button. |
|
Configure |
This button is only displayed for a 2D Tree. Click Configure to open a dialog box that enables you to set some of the layer properties. The layer properties change depending on the Layer type selected: a. Select the Layer type. b. If you want to select a layer using the Web Catalog Service, click the Catalog Service: Web button. Then select the server address, and search for the required layer. c. Enter the layer properties: · URL - The URL of the layer. · Layer - Select the required layer. Note: This field is only displayed for feature and map layers. · Name - The layer name. For feature and map layers, the name is automatically entered when a layer is selected. · MaxViewDistance - Sets the distance from the camera above which the layer disappears. Note: This field is only displayed for feature layers. · MinViewDistance - Sets the minimal distance from the camera below which the layer disappears. Note: This field is only displayed for feature layers. · Maximum parsing depth – If the KML file contains a link to another KML file, this value defines the maximum depth for which the link be followed. The default value is 2. Note: This field is only displayed for KML layers. · Extract styles – Select the checkbox to use feature styles defined in the KML file. Clear the checkbox to use styles defined by the user in the SGMap Style Editor. See Style field directly below. Note: This field is only displayed for KML and feature layers. · Style - Click Edit to open a layer property sheet (SGMap Style Editor) to set the appearance and behaviors of the features contained within the layer (e.g. line and fill colors/opacity and popup messages). Note: This field is only displayed for feature and KML layers. · Show popup - Select the checkbox to display a popup. The popup message is defined in the layer property sheet that opens by clicking the Edit button. Note: This field is only displayed for feature and KML layers. d. Click OK. |
|
Load on start |
Select checkbox to load layer when starting application. |
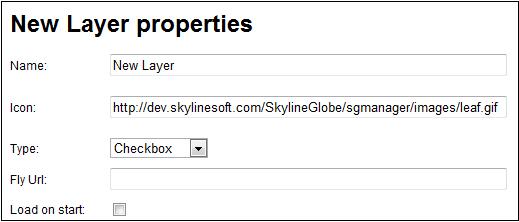
New Layer Properties
4. If you want to add a folder, right-click and select Add folder. The New Folder Properties dialog box is displayed.
|
Property |
Description |
|
Name |
The folder name. |
|
Icon |
An icon that will represent the folder in the Project Tree. |
|
Show checkbox |
Select checkbox to enable multiple selection (for display) of Tree folders. Select Radio button to require a single selection. |
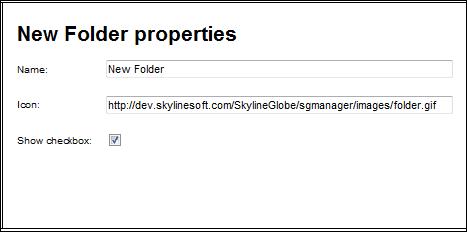
New Folder Properties
5. If you want to reference a different Project Tree in this Project Tree, right-click and select Add tree reference. The New Subtree Properties dialog box is displayed.
|
Property |
Description |
|
Name |
The subtree name. |
|
Icon |
An icon that will represent the subtree in the Project Tree. |
|
Select tree |
The Project Tree that you want to reference as a subtree of this Project Tree |
|
Show checkbox |
Select checkbox to enable multiple selection (for display) of subtrees. Select Radio button to require a single selection. |
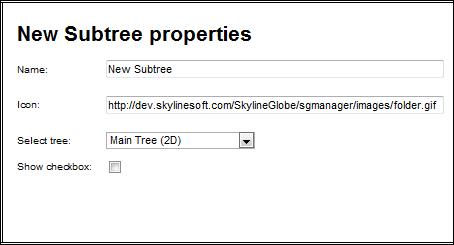
New Subtree Properties
6. Click any folder or layer to edit its properties.
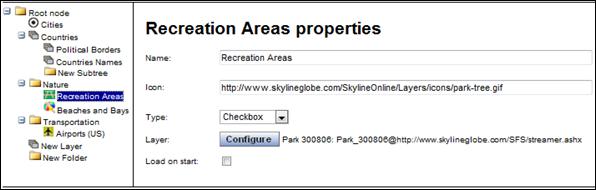
Layer Properties
7. Click Save.